Bring a Tiny Green World Home — No Experience Required
You don’t need a green thumb—just curiosity and a container. Build a charming, low‑maintenance terrarium in an afternoon for tiny spaces. It’s perfect for busy lives, plant murderers, and anyone who wants a small, worry-free indoor garden and zero fuss.
What You’ll Need (Yes, It’s Manageable)
Clear glass container with lid
Small plants (succulents or moss)
Potting mix + activated charcoal
Pebbles or gravel
Spoon or tweezers
Spray bottle
A sense of curiosity (and patience)
Must-Have
Exo Terra Nano Tall Glass Terrarium Kit
Patented front ventilation, waterproof base
A compact glass home designed for small reptiles and amphibians that keeps them comfy and contained. Features patented front-window ventilation, a raised waterproof base for a substrate heater, and escape-proof dual door locks—because Houdini tricks are for magicians, not pets.
DIY Terrarium: Simple Steps for a Beautiful, Beginner-Friendly Terrarium
1
Pick the Perfect Container
Glass jars, fishbowls, or a fancy apothecary jar — which tiny universe will you rule?
Choose a container based on the plants you want: closed jars for humidity-loving mosses and ferns; open bowls for succulents and cacti.
Pick size and opening width that fit both the plants and your patience—tall, narrow jars suit upright ferns; shallow bowls let succulents spread. Consider how it will look on your windowsill or desk; aim for something you’ll enjoy glancing at between coffee sips.
Closed containers — trap moisture: great for mosses, ferns, and tropical seedlings.
Open containers — breathe: ideal for succulents, cacti, and plants that hate soggy roots.
Size & opening — match plants and tools: wide mouths make planting easier; larger containers need more substrate.
Clean the container thoroughly to remove dust or residues that could harm young plants.
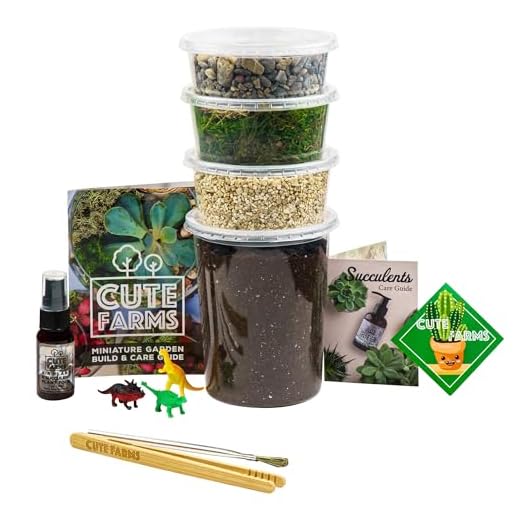
Family Favorite
Cute Farms Large DIY Terrarium Starter Kit
Everything needed to build a mossy terrarium
A complete DIY kit with preserved moss, soil blend, pebbles, tools, and an easy guide so you can build a living scene without the mystery. Made in the USA and perfect as a fun project or gift—for kids, adults, and anyone who likes tiny green worlds.
No roots drowned here — simple layers that pretend to be sunlight and soil magic.
Layer 1–2 inches of pebbles or gravel at the bottom to collect excess water. This prevents soggy roots and keeps your terrarium from turning into a swamp.
Sprinkle a thin layer of activated charcoal on top to filter odors and prevent mold—especially important in closed terrariums. Use aquarium or horticultural charcoal; for a small mason jar, about a tablespoon or a 1/4-inch layer works.
Pebble depth: 1–2 inches (use 2 inches for taller jars).
Charcoal amount: thin 1/8–1/4 inch layer (≈1 tbsp for small containers).
Level the base so soil and plants sit evenly and you’re ready for the next step.
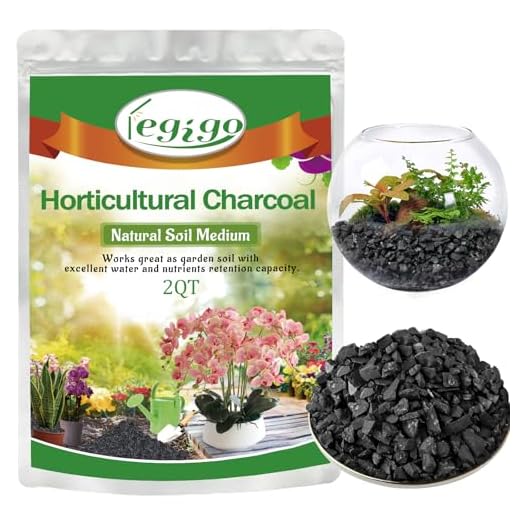
Plant Booster
Legigo 2QT Horticultural Activated Charcoal for Plants
Improves drainage and promotes root health
Lightweight horticultural charcoal that keeps potting mixes airy and drains excess moisture to prevent root rot. Great mixed into orchid, succulent, or terrarium substrates to boost aeration, regulate nutrients, and give roots a happier home.
One mix doesn’t fit all — soil is like a plant’s mattress: comfy matters.
Choose your potting mix based on the plants you picked. Use a cactus/succulent mix for dry-loving plants (think tiny aloe or sedum) or a peat-rich, all-purpose mix for tropical mosses and ferns. Don’t overthink it—match the soil to the plant’s native habitat.
Add a thin layer (2–3 inches) of your chosen mix so roots have room but the terrarium stays proportionate.
Depth: 2–3 inches of soil
Soil examples: cactus/succulent mix for succulents; peat/perlite mix for ferns and moss
Gently fluff the soil to keep it loose, then create shallow planting pockets with your fingers. Plant each specimen into its pocket without packing the soil tight—roots need air to breathe.
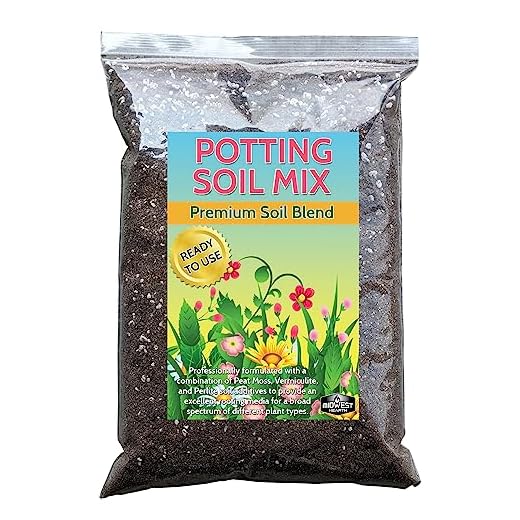
Pro-Grade
Premium Potting Soil Mix with Peat Moss
Ready-to-use mix used by professional growers
A balanced, ready-to-use potting mix with peat moss, perlite, and vermiculite that promotes strong root growth and good moisture control. pH-balanced and formulated for healthy development—think of it as a cozy mattress for your plant roots.
Tiny trees, living carpets, and a dash of whimsy — arrangement tips that don’t require art school.
Start by arranging your plants next to the container to test the look before you plant. Remove each plant from its nursery pot and tease roots gently to free tangled roots.
Position larger specimens toward the rear and lower ones in front to create natural depth. Make shallow soil pockets with your fingers and lower plants in using tweezers or a spoon for precision.
Root prep: tease roots lightly; don’t slice them.
Spacing: leave at least 1–2 inches between plants for airflow.
Tools: use tweezers or a spoon to avoid touching delicate leaves.
Add decorative touches—tiny stones, bits of bark, or a small figurine—to tell a story (a hedgehog by moss looks charming).
Position taller plants toward the back and shorter ones in front for depth. Remove plants from nursery pots, tease roots lightly, and place them into soil pockets. Use tweezers or a spoon for precision, and avoid crowding—plants need room to breathe. Add decorative touches like small stones or figurines.
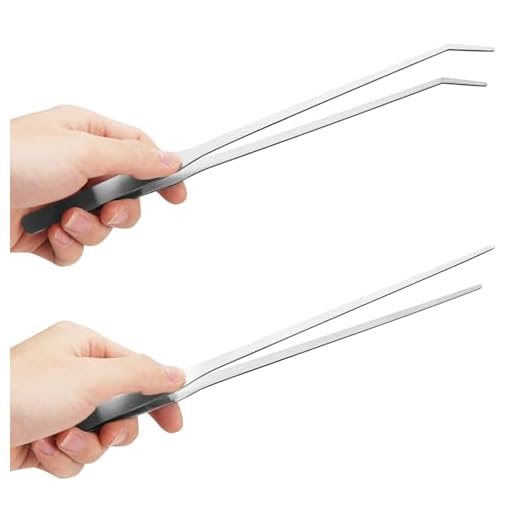
Best Value
Fri4Free 10.6" Straight and Curved Tweezers Set
Stainless steel feeding tongs for reptiles
Sturdy stainless-steel straight and curved tweezers that keep your hands safely away from hungry beaks and slippery bites while giving precise control. Serrated tips and a comfortable grip make feeding, aquascaping, and delicate terrarium work easier—no fingers harmed in the making.
Too much love can drown them — learn the tiny art of appropriate attention.
Mist closed terrariums sparingly; give open terrariums and succulents a deeper but infrequent drink. Use a spray bottle for moss and a small, controlled pour for cacti—watch the soil and never let water pool.
Open the lid for a few hours if a closed jar fogs constantly; think of it like airing out a steamy bathroom. Check soil before watering: damp soil = wait; bone-dry = water.
Watering methods: spray moss, light pour for succulents, deeper soak for mixed open terrariums.
Signs to watch: pooled water, yellowing leaves, or persistent fog = overwatering; shriveled leaves = underwatering.
Placement: put terrariums in bright, indirect light (east or north windows). Avoid direct noon sun—glass magnifies heat like a tiny greenhouse oven.
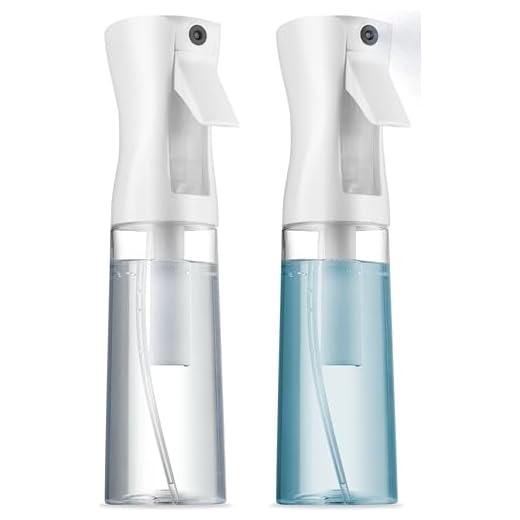
Salon-Quality
2-Pack Continuous Ultra-Fine Mist Spray Bottles
Salon-quality continuous mist for hair and styling
Continuous spray bottles that deliver an ultra-fine, even mist for hair styling, plant care, or light cleaning—perfect for salon results at home. Comfortable to hold and efficient, they mist without drenching, so you get pampered, not puddled.
Yellow leaves, mold, or mysterious puddles? Fix it fast — your tiny world depends on it.
Inspect weekly: remove dead foliage, trim overgrown bits, and wipe condensation when excessive — treat your terrarium like a tiny haircut and shower combo. Catch problems early so they don’t become drama.
Mold: increase airflow (open the lid for a day) or remove affected moss/soil; example: scoop out fuzzy patches and replace with fresh substrate.
Leggy plants: pinch back stems and rotate the container weekly for even light; example: trim a lanky baby fern and replant the tip as a cutting.
Condensation: wipe glass with a soft cloth or air out the jar for a few hours.
Keep a small journal: note watering dates and observations to learn your terrarium’s personality.
Editor's Choice
Ohtomber 4-Piece Aquascape and Terrarium Tools Kit
All-in-one stainless steel kit for aquascaping
A handy 4-piece stainless steel set including scissors, straight and curved tweezers, and a substrate spatula for precise trimming, planting, and cleaning in aquariums or terrariums. Rust-proof and long-reaching so you can sculpt landscapes without getting your hands wet—Zen gardening, but for fish and frogs.
Low-effort, high-joy—your mini ecosystem thrives! Try different styles, tweak plants, and share photos of your terrarium adventures with friends or online; we can’t wait to see them —start today, please.
Harper
Harper Evergreen is a dedicated content creator and the creative mind behind FrolicFlock.com. With a passion for humor, lifestyle, and all things quirky, Harper brings a unique perspective to the world of online entertainment.
I used a light-colored sand layer for aesthetics under the soil and it looked cool, but then tiny roots kept coming down into it and it looked messy. Is that a common issue? Should sand be avoided?
Nice visual, Maya. Sand is fine but it can compact and retain moisture differently. If roots invade, it’s usually okay — just gently rearrange or add a thin charcoal layer to separate. For succulents, coarse grit is better than fine sand.
I’ve done the same — switched to coarse sand/gravel and it’s less messy. Also looks nicer for beachy themes.
Loved this — super approachable for a total beginner. I went with a glass jar from the thrift store (step 1) and followed the drainage/base advice. Quick question: how long should I wait after planting before I do the first prune? Also, anyone else’s moss started looking a bit pale after a week?
I had the same moss issue — turned out my living room window gets hotter than I thought. I moved it a few feet back and the color came back after a week. 👍
Awesome, Jason — glad it felt accessible! Wait about 2–3 weeks before doing any shaping prunes so roots settle. Pale moss often means too much light or too little humidity; try moving it a bit farther from direct sun and misting lightly.
If you planted succulents with moss, that could be the problem. Moss and succulents generally want different moisture levels — maybe separate them next time.
Can someone explain closed vs open terrariums in plain English? I’m still fuzzy on the difference beyond ‘lid or no lid’. Which is better for beginners?
Short answer: closed terrariums create a humid microclimate and recycle moisture (good for ferns, moss). Open terrariums have more airflow and are better for succulents/cacti. For beginners, pick based on plants you like — open is generally lower maintenance if you’re unsure.
Closed = like a little greenhouse. Mine kept everything moist so I put in tropical plants and they thrived. If you want succulents, do open.
First attempt: I used a sealed jar and it basically became a fog machine. Second attempt: left the lid slightly ajar and it stabilized. Moral: experimentation matters. Also, this is a calming hobby that doesn’t require plant PhD. Highly recommend!
Same here, fog machine vibes. Now I check condensation daily the first week to get a feel for how it behaves.
This made me laugh. I call mine ‘the greenhouse of doom’ the first month 😂
Exactly — small adjustments and patience go a long way. Glad you found a balance that works for you!
This guide is adorable and WAY less intimidating than I thought. I do have one dumb question: the article mentions a ‘right soil mix’—is potting soil alone ok for a tiny closed terrarium or do I need to mix in anything else? I don’t want to mess it up lol.
Not a dumb question at all! For closed terrariums, you want a mix with good drainage and lower nutrient load — try potting soil mixed with some orchid bark or perlite (about 70% potting soil, 20% perlite, 10% bark) so it doesn’t stay soggy.
I do 50/30/20 (soil/perlite/peat) and it’s been fine for months. Experiment a little depending on your plants.
I have a glass terrarium with alternating layers of charcoal and pebbles. It’s been 6 months and still looks fresh. Small suggestion: include a quick shopping list printable in the guide — I had to jot down materials separately. Would be super helpful for newbies.
Yes please a checklist! I kept forgetting to buy charcoal and had to improvise lol.
Great suggestion, Aaron — a printable shopping list is a cool idea and something we’ll consider adding. Glad the charcoal layer is working well for you!
Also a small troubleshooting checklist (mold, yellow leaves, droop) would save beginners panic time.
I’ll make a printable cheat sheet and share it here if anyone wants. 😊
Okay real talk: I tried making a ‘mini jungle’ and it turned into a moldy swamp in three days. Followed the drainage step but maybe overwatered. 😬
I think step 5 could use more photos of how much ‘a little water’ actually is. Like, how many teaspoons for a 16 oz jar??
Thanks for the honest feedback, Nina — really helpful. For a 16 oz jar, start with about 1–2 teaspoons and check the soil after a week. If condensation is constant, cut back. I’ll pass on the request for more photos to the team.
I use a syringe to water tiny amounts — way less messy than a watering can. 1 tsp is usually plenty for me in small jars.
Also, trim dead leaves right away. They feed the mold. I learned the hard way!!
Yup, mold = too wet + poor airflow. Try leaving the lid off for a day every week or two to let it breathe if it’s closed. Also remove any rotting bits ASAP.
I built one with succulents in an open bowl — looks great so far. Quick note: if you’re using rocks for drainage, tilt them slightly so water doesn’t pool… worked wonders for me. Also, don’t forget tiny pebbles look great as a top dressing.
Agree on pebbles — low effort, high aesthetic. Also prevents curious cats from digging 🤣
Great tip, Marcus — pooling around rocks is a sneaky issue. Top dressing really finishes the look and helps reduce splashing soil when you water.
I have a very silly question: do I need to feed my terrarium plants fertilizer? I read the guide but couldn’t tell if occasional feeding is recommended for a closed system.
Same here. Once I over-fertilized and regretted it. Stick to sunlight and correct moisture first.
Not silly! Generally no — closed terrariums often don’t need fertilizer because nutrients cycle within the system. If plants look pale or slow-growing after months, a very diluted, occasional feed (half-strength) in spring can help.
I usually avoid fertilizer unless something looks really off. Too much and you encourage algae/mold.
Seriously impressed by how doable this is. I appreciate the ‘visual balance’ planting tips — I tend to cram too much in and it looks chaotic. Small constructive note: maybe add a section on plant compatibility (which plants play nicely together).
Compatibility chart would be gold. I made some weird combos that didn’t end well 😅
Thanks, Hiro — compatibility charts are on our roadmap. In short: pair humidity-loving plants together and keep succulents separate. We’ll expand that section soon.
One more thought: include sample plant pairings for closed vs open terrariums. Super helpful for beginners.
Agree — also include common height/width expectations so people don’t overplant.
Super fun project for the weekend. My partner and I made three — one glass dome, one mason jar, one fishbowl. The mason jar was the simplest. Pro tip: tongs or chopsticks are lifesavers for arranging plants in small openings!
Also fishing line for securing taller stems if you need them upright while roots settle.
Chopsticks + a toothpick for fine adjustments = terrarium zen mode. 😂
Fantastic — chopsticks are indeed underrated terrarium tools. Glad you tried multiple containers, that’s the best way to learn what works for your space.
I gotta say, the troubleshooting section saved my first attempt. I had random condensation and yellowing leaves; the fix was simply more light and removing a damp leaf. Small changes, big results. Also, the guide’s casual tone made it less intimidating — thanks!
Love to hear that, Daniel. Those tiny adjustments really add up. Keep observing — that’s half the skill of terrarium care.
Yesss observation is key. I check mine like it’s a tiny pet every few days lol.