

Wake Up Your Latte: Froth Like a Pro (Without a Degree)
Ready to transform your mornings? This cheeky guide shows why silky microfoam matters and teaches how to pick milk, prep tools, stretch then polish foam, and pour simple latte art — fast, friendly, and café-level results at home every day.
What You’ll Need (and What You Can Skip)

4 Easy Tips for Perfectly Steamed and Frothy Milk for Latte Art
Pick the Right Milk: Don’t Let Your Latte Flop
Oat vs. cow vs. almond — is there a secret champion? Spoiler: texture beats trend.Choose whole cow’s milk for the creamiest, most stable microfoam — the fat and casein give you glossy, velvet bubbles that cling to espresso. Think café-quality mouthfeel, not a sad, airy top.
Opt for low-fat if you want bigger, lighter foam (good for a cappuccino), but expect less sheen. Pick oat milk for a creamy, naturally sweet plant option; buy barista blends for better stability. Try soy if you don’t mind a faint beany note; avoid plain almond unless it’s a barista version.
Keep milk cold and fresh — pull it straight from the fridge. Pour only to the pitcher’s widest part and leave room for expansion (fill to about one-third for steaming). If you’re making a drink for two, imagine the milk doubling in volume and don’t overfill.
Key considerations
Fat %: Whole = rich microfoam; low-fat = airy bubbles.
Freshness: Fresher = better froth and flavor.
Type: Barista-formulated plant milks foam best.

Prep Your Tools: Clean, Position, Purge — Repeat
A dirty wand is a latte killer — who knew hygiene could taste so good?Check your steam wand and pitcher before you begin. Purge the wand briefly to clear condensation and heat it for a second, then wipe it clean to avoid sputters — you don’t want surprise spit during aeration.
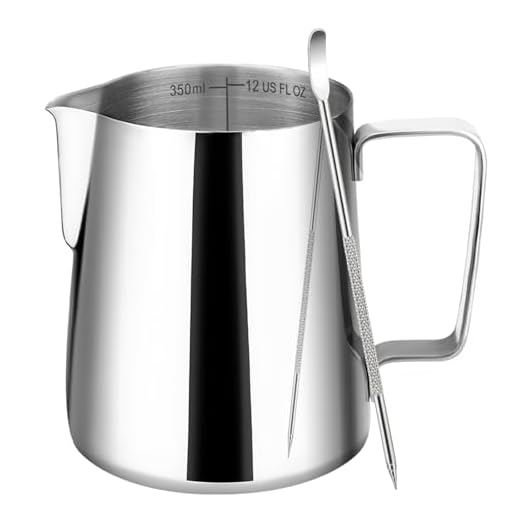
Use a cold, narrow stainless-steel pitcher sized to about 1.5× the milk volume. Fill to about one-third so you can stretch without overflow — for example, choose a ~12 oz pitcher for a single 8 oz latte and pour to the 1/3 mark.
Angle the pitcher slightly and position the wand tip just below the surface at first to introduce air (you’ll hear a soft “tss”); then lower the tip deeper to create a whirlpool and finish smoothing the texture.
Preheat the pitcher with hot water if you’re using a handheld electric frother, dry it, then add cold milk and follow the device’s recommended depth and motion (slow up-and-down or gentle tilt depending on your frother).
Handle steam carefully: wrap a towel around the wand base and keep fingers well away from the hot tip.

The Two-Part Froth: Stretch, Then Paint Velvet
Think of frothing like cardio then yoga — get the air in, then relax into silky texture.Start stretching with the wand tip at the surface so you hear a steady “chirp,” not a scream—think gentle bird, not jet engine.
Introduce small amounts of air for 3–6 seconds (count aloud if it helps) to avoid big bubbles; for example, a quick two-count like “one-one-thousand, one-one-thousand” works well.
Submerge the tip slightly and lower the pitcher to create a whirlpool; this folds the air into tiny bubbles and turns froth into silky microfoam.
Keep the whirlpool steady and the steam at medium power—too much power rips big bubbles, too little won’t integrate them.
Aim for 55–65°C (130–150°F) depending on taste; hotter collapses foam and scalds milk.
Place a thermometer on the pitcher side near the wand if you want exact temps, or stop when the pitcher is uncomfortably hot to touch.
Practice controlling the tip depth and angle; small adjustments dramatically change bubble size.
Finish the Foam: Tame Big Bubbles and Shine the Surface
No one likes giant bubbles — here’s how to banish them like a foam whisperer.Remove the wand immediately, then wipe the tip with a damp cloth and purge the steam briefly. Do this like wiping a nose—quick and decisive—so milk doesn’t crust the wand.
Knock the pitcher lightly on the counter to break stubborn large bubbles. Give the pitcher a couple of firm, controlled swirls to merge foam into glossy microfoam. Think of stirring a tiny whirlpool in a teacup.
Tap and swirl until the texture looks like wet paint: velvety, slightly reflective, and free of popcorn-sized bubbles. Aim for a smooth sheet of foam that glides off a spoon.
Troubleshoot common problems:
Rework stubborn foam by gently whisking for a few seconds or using a milk spoon to skim off big bubbles. Use a handheld frother briefly if needed for rescue.
Keep foam temperature comfortable to the touch on the pitcher—if too hot, it’s likely over-steamed and flavor will be dull.

Pour and Present: Simple Latte Art and Serving Tricks
Pour like you mean it — even a sloppy heart looks charming with glossy foam.Tilt the cup toward the pitcher. Start pouring from high to mix espresso and milk; lower the pitcher as the cup fills.
Drive the stream faster and closer when you want foam to surface. Aim for control—not a firehose—so your heart or rosette stays tidy.
Practice these quick moves:
Swirl milk to homogenize liquid and foam before pouring. Tilt the cup and start with a high pour to mix espresso and milk, then lower the pitcher and pour faster to bring foam forward. For a basic heart: pour into the center, wiggle slightly, and pull through. For a rosette: shake gently while moving back, then pull through. Aim to finish within 5–10 seconds of steaming so foam is fresh. Serve immediately for best mouthfeel. Clean the wand right away: wipe with a damp cloth, purge, and soak removable tips occasionally. Store milk properly and discard leftover steamed milk. Small presentation tips: pre-warm cups, wipe the rim, and offer a spoon for foam lovers. Practice and play — latte art is 10% technique, 90% joyful repetition.
Go Froth Your Way to Coffee Glory
With the right milk, clean tools, staged technique, and a cheeky pour, you’ll make café-level lattes at home; keep practicing, laugh at the blobs, and savor every velvety sip. Ready to froth your way to coffee glory starting right now?


Loved the detail on purging and positioning. Also wanted to add: use a small thermometer for the first few tries. I used to overheat everything until I learned the 55–65°C sweet spot.
Extra tip: warm the pitcher a bit before steaming in cold kitchens — helps with consistent results.
Cheers!
Appreciate all the additions! We’ll include a quick bullet list of practical equipment tips (thermometer, warm pitcher, towel) in the guide.
Thermometer = game changer. Also, don’t be shy about practicing on cheap milk first. No one needs a $5 latte lesson on day one.
Thanks for the thermometer tip — that’s exactly the kind of practical detail beginners need. We’ll call that out more explicitly. Warming the pitcher is a great climate-aware suggestion too.
I always forget my thermometer lol. My learning curve = burnt milk city. Thanks for the reminder.
Yes to warming the pitcher — my hands-free method: run it under hot tap for 10s. Works like a charm.
Nice walkthrough. I’m trying to froth unsweetened oat milk — anyone else find it slips through the cup and doesn’t cling? Wondering if I should try barista blends only.
Great question. Oat milks vary a lot. Barista blends are formulated for texture and usually work best. If using plain oat milk, try slightly less stretching and aim for a smooth, glossy finish rather than super thick foam.
I use plain oat at home and add a tiny pinch of powdered milk (weird hack) to improve body. Barista blends are easier, but you can make plain oat behave with practice.
I was the person who thought frothing = microwave + whisk. This guide rescued me from that dark timeline.
Quick question: when you say “paint velvet,” how far should the tip be submerged? I get either air-sucking noises or zero texture.
Also, why does my foam sometimes look like a marshmallow apocalypse? 😅
Hah, microwave whiskers are a thing. For “painting” keep the tip just below the surface and tilted slightly — you want a gentle swirling motion, not a full submerge. The marshmallow texture usually means too much stretching or the wand was too close to the surface for too long.
Marshmallow foam = overtensioned ego of your espresso machine. 😜 But seriously, less is more sometimes.
If you hear loud screeching air noises, that’s the tip being too high. Push it down a hair and it calms. Took me forever to learn that one.
For me, a tiny tweak helped: lower steam pressure for the first 2 seconds, then speed it up. Sounds odd, but it reduced the giant bubbles.
This guide is chef’s kiss. The ‘Wake Up Your Latte’ intro actually made me laugh out loud.
I will say: it took me a full week of practice to get consistent microfoam, but following the TWO-PART froth exactly made the breakthrough happen.
Also, beginner-friendly tip: practice latte art on hot chocolate first — fewer variables.
Thank you! Love the hot chocolate practice idea — smart and delicious. Great to hear the two-part method was the breakthrough for you.
Hot chocolate practice is underrated. No crema, but you get the flow down.
I did the hot chocolate route too. 0% judgement, 100% improved hearts.
Loved the step-by-step — super clear!
I tried the stretch-then-paint method last weekend and actually got velvety foam for once.
Biggest win: purging the wand BEFORE you start. Saved me from gross sputters.
One small gripe: would love a quick chart of temps for different milks.
Otherwise, this guide is a keeper. 😊
Purging saved my life too. Pro tip: keep a little towel ready, because my counter ended up looking like a latte crime scene once.
Yep, temp chart would be clutch. I burned a batch of oat milk the first time — never again 😂
Thanks Sarah — glad it worked for you! Good call on the temp chart idea, we’ll add a small table for oat/almond/cow milks in the next update.
Question for anyone: how long did it take you to get decent at simple latte art (heart/rosette) after mastering the froth? I’m practicing and keep spilling espresso everywhere. 😂
Any small practice drills welcome!
I set a cardboard target in the sink and practiced pouring until I hit the center consistently. Embarrassing but effective.
Start with pour speed: slow steady pour until cup is ~80% full, then a quick wiggle for the heart. I practiced pouring water into a mug to get my hand steady before using milk.
Everyone’s timeline is different, but many people see improvement in 1–2 weeks of daily practice. Drills: practice pouring speed into empty cups to get the motion, then try hearts on hot chocolate as Olivia suggested. Film yourself pouring to spot posture/angle issues.
Good guide, but be warned — almond milk + too much heat = sad, separated latte. I think the “Stretch, Then Paint” steps helped, but the timing feels finicky.
Totally hear you. Almond and other nut milks are picky: aim for lower final temp (around 55–60°C / 130–140°F) and shorter stretch time. We’ll clarify that in the almond milk section.
Shorter stretch for almond — noted. I also whisk for 5 seconds after steaming if it looks off, helps a tiny bit.
Constructive feedback: the “Tame Big Bubbles” section is good but could use more pics of before/after bubbles and the exact wand angle. I kept guessing and made a few sad lattes.
Also, is there a reason some cups get more shine than others? Mine sometimes looks dull even when texture is right.
Also, some cups (matte ones) hide shine better. Might be the cup, not the foam.
More pics please. My first latte looked like modern art gone wrong; a photo guide would’ve saved me the existential crisis.
Great notes. We’ll add more before/after photos and diagrams showing wand angle and pitcher tilt. Dull surface often comes from overheating or not finishing with the fine swirl — we’ll expand that section.
Shine = proper microfoam and a final tap-and-swirl. If you microwave it after (don’t do it) it’ll go dull real fast.
Short and sweet: this fixed my bubble problem. Thx.
Also, accidentally steamed my phone once, don’t ask lol
Phones in the danger zone are a national pastime. Glad yours survived — hopefully with only minor coffee breath.
Glad it helped! And yikes — phones + steam = expensive mistake. Keep electronics well away from the barista zone.