
Unleash Your Inner Artist!
Transform your art with neon acrylics—colors so bright they were banned from stone-age caves! Dive into vibrant pouring techniques and amaze everyone as your canvas glows. Quickly master these steps, create visuals that are practically eligible for their own sunshine tax, and watch as your creativity pours forth!
Gather Your Gear!

Step 1: Choose Your Neon Warriors
Why Settle for Basic When You Can Shine Bright?Begin your neon journey by diving into the exuberant world of neon colors. Each hue carries its own story and energy, so choose wisely. Identify the mood you wish to convey. Are you feeling electrified by a bold electric blue, or are you drawn to the sizzling drama of a blazing neon pink? Maybe a radiant orange screams summer sunset to you, or perhaps a zesty green channels a futuristic vibe.
Visualize the impact each color will have on your masterpiece. Picture a symphony of neon warriors lighting up your canvas like a bustling city at night. Bold choices lead to more compelling stories, so let your imagination run wild.
To start, grab a basic neon acrylic paint set from your local art supply store. This usually includes a spectrum of classic bright colors such as neon yellow, pink, orange, green, and blue. Don’t be afraid to add in specialty hues like neon purple or fluorescent red if you’re feeling adventurous.
Remember, these colors aren’t just paint; they’re the luminous characters of your artistic tale ready to illuminate your creative visions!

Step 2: Mix Like a Pro
Is It Chemistry or Magic? You Decide!Unleash the magic by combining your vibrant neon paints with a pouring medium. Think of this as your secret potion that transforms those thick paints into silky, fluid marvels dance-ready. Aim for a honey-like consistency; too thick, and your colors will crawl like a snail, too runny, and they might as well be racing off your canvas!
Start by pouring equal parts of paint and medium into a clean mixing container. Stir gently, letting the colors mingle with grace, just as dancers would in a neon-lit ballroom. Channel your inner mixologist, but remember—this isn’t a cocktail party, so keep it classy.
Imagine Bob from next door, who once found himself with paints that seemed more like glue, turning his artwork into a tragic neon mess. But fear not, for a well-mixed medium promises a vibrant, free-flowing spectacle.
Test your mix by lifting a stir stick; the paint should flow off like warm honey from a spoon. Adjust as needed until you achieve that perfect balance, watching as your colors sway elegantly in your container. Now you’re ready to pour with pizzazz!

Step 3: Layer and Pour
Channel Your Inner Cake Decorator!Dive into Layering: It’s all about stacking your colors to create a mesmerizing masterpiece. Pour each of your mixed neon paints into a single container, without stirring them together. Think of this as building the rainbow-in-a-cup—except here, colors stand tall instead of blending into one mushy shade!
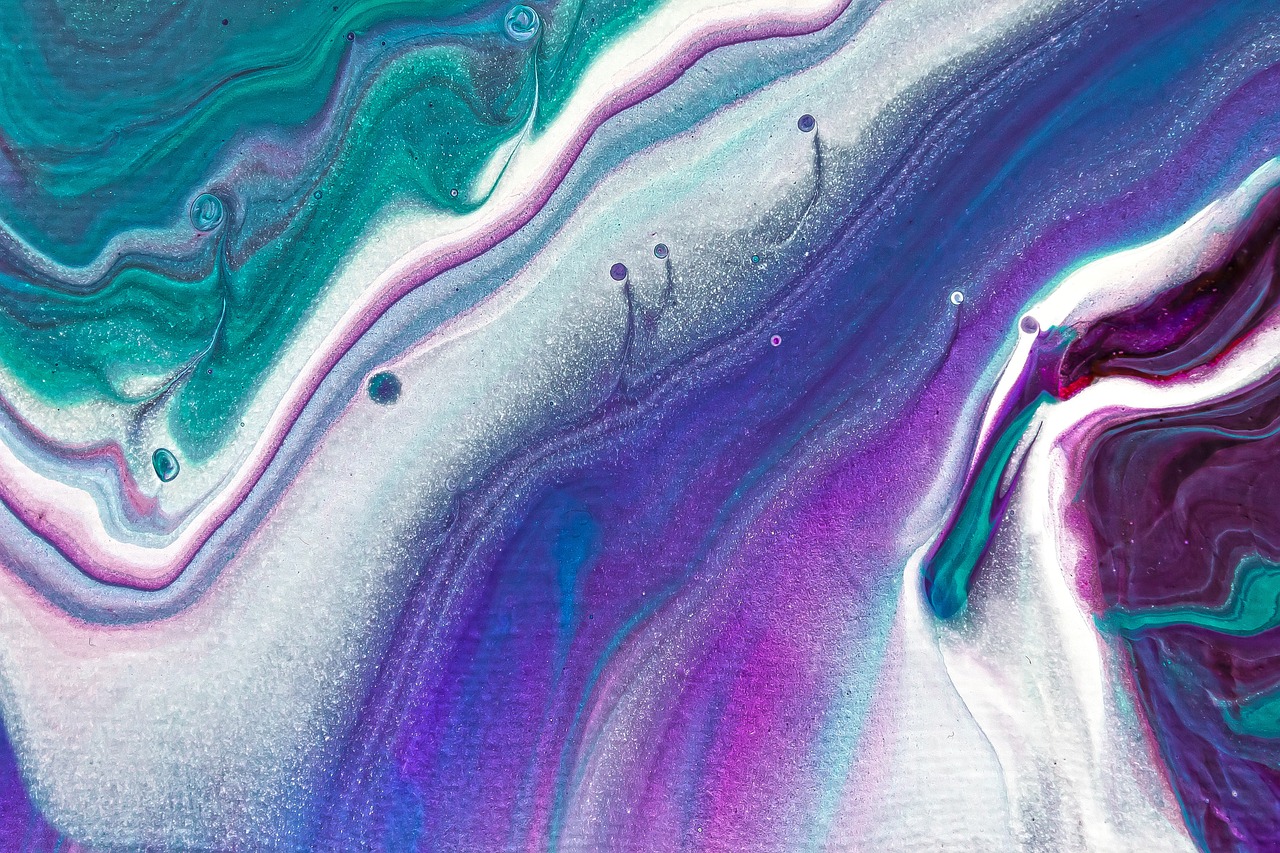
Picture this: you start with that zesty neon green, covering the bottom of your cup, followed by a sizzling neon pink, topped with a radiant orange and capped off with that bold electric blue. The result? A glorious strata of vibrant hues ready to create magic on your canvas.
Pour with Flair: Now, the real fun begins! Grab your gorgeous cup of layered colors and start pouring onto your canvas in swirling, graceful motions. Imagine you’re crafting an abstract neon waterfall. Allow the colors to cascade and collide as they please, each ripple adding spontaneity to your artistic tale.
Channel your Picasso, or even consider yourself a paint-wizard casting colorful spells upon your canvas. Watching the colors merge and dance will be as thrilling as that time Grandma tried virtual reality for the first time. Let the art unfold as your passion takes shape!

Step 4: Tilt and Torch
Gravity is Your Best Friend!Tilt your canvas gently, allowing the paint to flow. Imagine you’re guiding a delicate lava lamp—steady hands, and let gravity do its work. The colors will merge, swaying gracefully, forming intricate patterns right before your eyes. This is your moment to dance with the paint; tilt left, tilt right, even in gentle circles. Each motion crafts a unique visual sonnet on your canvas.
Watch the magic unfold. As the paint streams across the surface, witness the birth of vibrant rivers and colorful nebulae. Every tilt is a new verse in your artistic poem, as hues glide and swirl. Picture the liquid movement reminiscent of nature—a wandering stream, a bursting nebula, a fiery aurora.
Equip your torch, and bring those bubbles to the surface! Hover the flame briefly over your masterpiece—a quick and gentle pass like a sculptor bringing a chisel to marble. As the bubbles burst, they create tiny craters that add depth and texture. Watch as your canvas transforms, revealing more layers beneath the neon sea.
Let the torch’s light be your brush and the flame your tool in sculpting stunning, dynamic artwork.

Step 5: Finish with Flair!
Let It Show, Let It Glow!Give your masterpiece time to dry. Let patience run the show here—think of it as a neon age, where each color awaits its moment to shine. Like cupcakes fresh from the oven, your canvas demands stillness before serving up its final brilliance.
Admire the vibrant colors as they set, revealing a spectacular glow under light. You might spot new details with every glance, like discovering a city skyline in a splash of orange or a cosmic dance floor in swirling pinks.
Protect your artwork with varnish, bestowing upon it the gift of eternal glamour. Grab a can of high-gloss varnish and spray a light, even coat over your painting, giving it that enviable glossy finish—cue the oohs and aahs! This step isn’t just about aesthetics; it shields your creation from dust and time.
Display or share your neon adventure: Frame it majestically, making it a talking point of your gallery wall, gift it to a fellow art lover, or hang it where the light catches its every facet. Your neon odyssey has transcended canvas, radiating into your world, flaunting its electric energy for all to see!

Celebrate Your Neon Masterpiece!
You’ve taken a bold leap into the world of neon acrylics. Revel in your creation and let it illuminate your space. Keep that artistic spirit glowing! As the vibrant colors dazzle your eyes and spirit, ask yourself: What other brilliant shades will your creativity unveil next?


Not to be a party pooper, but I found the ‘Torch’ step a bit risky. Anyone else worried about safety? 🔥
Totally get what you’re saying, Daniel. I use a heat gun instead, works just as well without the flame!
Safety first! Thanks for raising this, Daniel. Always follow manufacturer guidelines and have proper ventilation.
Step 5 is my favorite! Adding those finishing touches makes all the difference. I used glitter for a little extra flair ✨
I sprinkled it on top while the paint was still wet. It looks like a galaxy now 😍
That’s a fantastic idea, Ava! Glitter can really add that extra oomph.
Ooh, glitter sounds awesome! Did you sprinkle it on top or mix it into the paint?
Love this article! 🎉 The ‘Choose Your Neon Warriors’ section got me pumped to experiment with new color combos. Neon orange and blue, here I come!
Neon orange and blue sound wild! Post pics if you can, Zoe!
Can’t wait to see your masterpiece, Zoe! Those colors are sure to make a statement.
Will do! Just ordered my supplies, can’t wait to get started.
Interesting guide. But I got a bit stuck at the ‘Layer and Pour’ step. I couldn’t get the layers to stay separate, any tips?
Hi Oliver! Make sure each layer is thick enough and pour slowly to maintain separation. Also, try different pouring angles.
I had the same issue! I think using a little silicone oil helped me get better separation.
Thanks, I’ll try that next time! Chloe, did the silicone affect the drying time?
Great guide, but I think my colors got kind of muddy? 🤔 Any advice for keeping them vibrant?
I had the same issue! I found that using fewer colors per pour helped keep them bright.
Thanks, Sophia! I’ll give that a shot. Maybe I’ll stick to three colors next time.
Hey Jackson, try using less mixing medium and make sure each color is fully mixed before pouring.
OMG, I didn’t know mixing neon paints could be this fun! 🎨 I tried it out with some neon pink and green, and the colors just pop! 🔥
Right? It’s like having a mini-rave on your canvas. What kind of surface did you use for pouring?
Glad you enjoyed it, Jessica! Neon colors have a way of brightening up any canvas. Would love to see your creation!
I’m not super into art, but this was actually super satisfying! The ‘Tilt and Torch’ step is like magic. 🔥
Happy to hear you enjoyed it, Emily! The torch really brings out those patterns, doesn’t it?