
Shiny Dreams: Why a Glass-Like Epoxy Finish Is Worth the Effort
Ever wish your coffee table could double as a mirror for your mug? Over 60% of hobby woodworkers chase that mirror-smooth epoxy look — and for good reason. Epoxy gives depth, clarity, and durability that varnishes or oils simply can’t match, turning plain slabs into jewel-like surfaces.
This guide walks you through choosing the right epoxy, prepping wood, setting up a clean workspace, mixing and pouring without bubbles, and sanding and polishing to a glass finish. You’ll also learn quick fixes for common disasters and tips for long-term care — so your shiny masterpiece stays mirror-ready for years to come and admiration.


Sand
Know Your Epoxy: Types, Properties, and the Look They Give
Casting vs. Coating: what they are and when to use them
Casting epoxy is the heavy lifter—formulated for deep pours (think river tables or encapsulating objects) and cures in thicker layers without overheating. Coating (or pour) epoxy is thinner and self-leveling, meant for glossy topcoats and thin layers (usually up to 1/8″–1/4″ per pour). If you want depth without a volcano of heat, use casting for the bulk and a coating epoxy for the final mirror surface.
Viscosity, pot life, and cure times—plain language
Viscosity = thickness. Low-viscosity resins flow and self-level (great for optical clarity). High-viscosity resins hold shape for sculpting or filling gaps. Pot life is your working window—like milk left on the counter: short pot-life resins “go off” fast; long pot-life gives you breathing room but may take longer to harden. Typical tack-free times: 6–24 hours; full cure: 24 hours to several days. Deep pours often take a week or more to reach full hardness.
UV resistance, yellowing, and clarity additives
All epoxies can yellow eventually, especially in sunlight. Look for “UV-resistant” or “non-yellowing” labels, or resins with UV inhibitors and clear hardeners (brands: ArtResin, TotalBoat Clear Table Top, and Pro Marine offer low-yellowing options). Additives like UV stabilizers help, but no epoxy is perfectly immune—use UV-resistant topcoats or glass for museum-grade clarity.
Practical picks & quick tips
Next up: picking and prepping the wood itself—grain, moisture, and sealing tricks that make your chosen epoxy shine.
Pick and Prep the Perfect Wood: Grain, Moisture, and Sealing
Choose the right species and slab
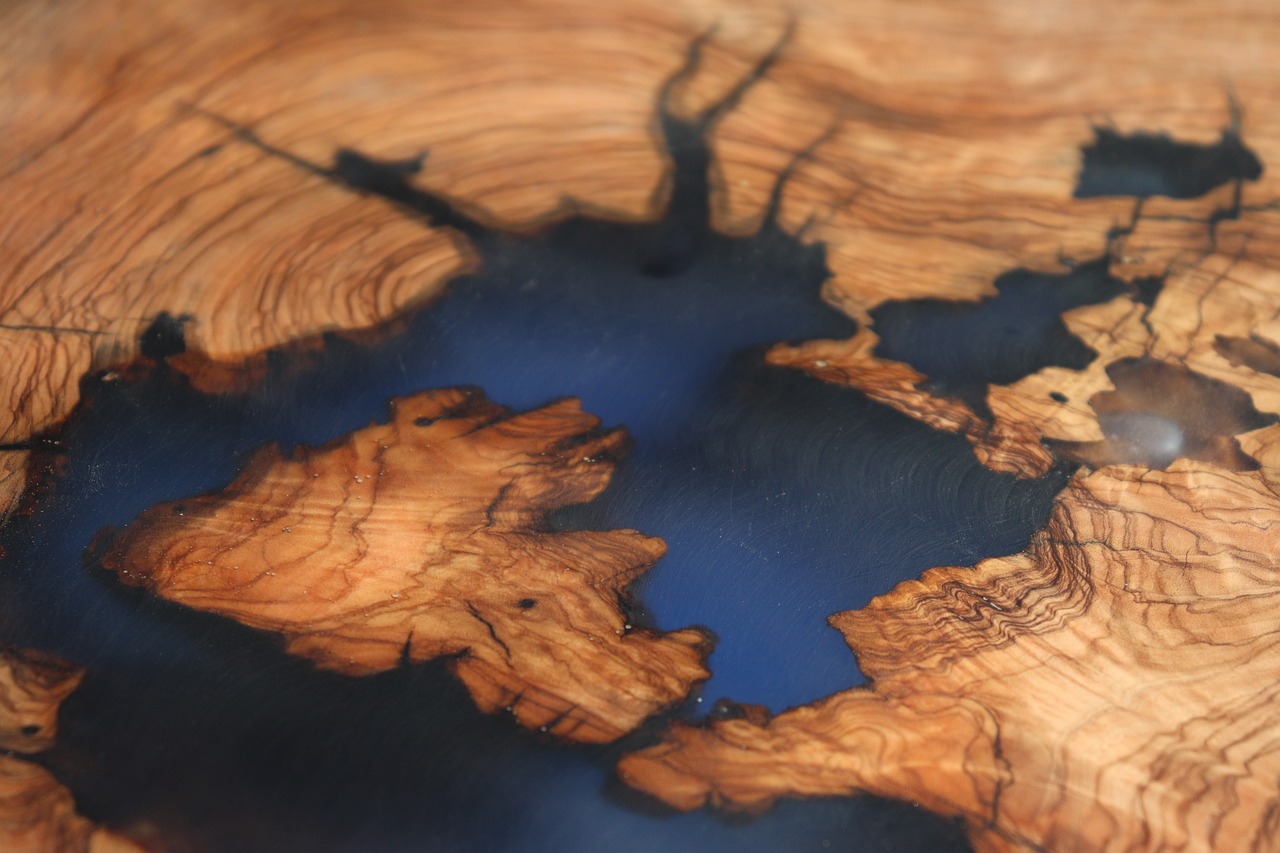
Not all woods behave the same under epoxy. Stable, kiln-dried hardwoods (maple, cherry, walnut) are ideal. Avoid extremely oily species (teak, rosewood) unless you plan aggressive degreasing, and be cautious with high-tannin woods (oak, mahogany)—they can discolor a clear epoxy over time. Live-edge slabs with voids look fantastic, but treat the voids consciously rather than pretending they’ll sort themselves out.
Check and control moisture content
Moisture is the enemy of a clear cure. Target 6–8% MC for indoor pieces; 8–12% may be acceptable in humid climates. Anything above ~12% risks bubbling, poor adhesion, or ambering. Acclimate slabs in your shop for 1–2 weeks (longer for large slabs) and retest before pouring.
Practical tip: use a pin meter for inside-the-wood readings; compare to a non-contact meter for surface readings.
Dealing with cracks, knots, and voids
Sealing techniques to prevent bubbles and bleed-through
Don’t be tempted to pour epoxy on a tree still growing in your yard — it won’t end well for either of you. Next up: assembling tools, choosing the right workspace, and avoiding rookie mistakes that ruin a glossy pour.
Tools, Materials, and a Workspace That Won’t Ruin Your Project
Essential tools and materials (buy once, cry less later)
Get gear that won’t fail mid-pour. Essentials:
Workspace basics: avoid the “dust everything” tragedy
Setup tips for larger pours and practical safety
For slabs and river tables: support with multiple sawhorses and a sacrificial sheet (melamine) under the slab; use clamps and silicone or hot-melt dams to stop leaks. For deep pours, build a backing for first flood coat and pour in layers—big pours mean big heat, so stagger batches and monitor exotherm.
Friendly safety reminders: no open flames near solvent-saturated rags, keep kids/pets out, and don’t taste-test fumes (seriously). Next up: how to mix, pour, and kill bubbles so your surface starts life perfectly.
Mixing and Pouring Like a Pro: Techniques for Bubble-Free, Even Coverage
Measure it right: weight vs. volume
Always prefer a digital scale (tare your cup first). Weight guarantees the correct resin:hardener ratio — e.g., a 2:1 system means 200 g part A to 100 g part B. Volume can fool you because parts have different densities. For small fixes, manufacturer volume cups are fine; for anything visible, weigh.

Slow, gentle mixing — think soup, not meringue
Quick real-world tip: I once whisked too fast and ended up with a mousse of bubbles — don’t be me.
Layering strategy: deep pours vs single coats
Bubble control & heat tools
Practical pouring methods
Avoid common mistakes: don’t mix cold resin (warmer = lower viscosity), don’t rush, and don’t overheat. Next, we’ll turn that cured surface into a mirror.
Sanding, Polishing, and Building Mirror Shine
When to sand: patience pays
Wait for full cure per manufacturer (often 24–72 hours for thin coats; up to a week for deep pours). Do the fingernail test—if it dents or feels gummy, wait. Always work in a well-ventilated area and wear an N95 respirator and eye protection.
Grit progression: flatten, refine, perfect
Start coarse enough to remove waves or orange peel, then refine:

Wet vs. dry sanding & tool tips
Use dry sanding up to 600, then switch to wet sanding (water with a drop of dish soap) with waterproof silicon-carbide paper from 1200+. Wet sanding reduces heat and clogging. With a random-orbit sander: use a 5″ pad, low speed, light pressure, and keep it moving to avoid flat spots or swirl marks. A DA polisher (Porter-Cable 7424XP) is ideal for polishing stages.
Polishing compounds, pads, and technique
Polish in stages: aggressive cut, medium polish, then ultra-fine finish.
Quick troubleshooting
Next up: we’ll cover common problems and fast rescues so your mirror finish stays mirror-perfect.
Common Problems and How to Fix Them — Quick Rescue Tricks and Long-Term Care
Bubbles after cure
If you find small pits or trapped bubbles after full cure, don’t panic. For isolated pits: sand the area flat (400–600 grit), clean, then syringe in a thin, well-mixed epoxy glaze and let cure. For numerous bubbles: grind 1–2 mm deep across the affected area, vacuum and wipe with isopropyl alcohol (90%+), then fill with a fresh pour. For tiny surface nibs, a razor scrape followed by spot-glaze and polish works fast.
Tacky or soft spots — bad mix vs. environment
Diagnose: bad mix usually smells strong, is soft throughout, and shows irregular cure. Environmental cure failure (too cold/humid) typically leaves only the surface tacky.
How to fix:

Sanding and re-coating for imperfections
Feather out transitions with 320–600 grit, then wet-sand 1200+ before polishing. Always clean with solvent-free tack cloth, then a 70–90% IPA wipe before recoat. Use a barrier coat if you’re unsure about adhesion—thin, low-viscosity first layer, then your finish pour.
Yellowing and UV damage
Minor haze: polish. Moderate yellowing: sand and recoat with a UV-stable epoxy or a UV-resistant water-based polyurethane such as General Finishes High Performance Top Coat. For long-term protection, select an epoxy labeled “UV-stable” or add a UV-blocking topcoat.
Care & maintenance (keep that shine)
Next, we’ll wrap up how all these fixes and habits help you keep that mirror finish for years.
Wrap-Up: From Messy Pour to Mirror Finish (Yes, You Can Do It)
Choose the right epoxy, prep and seal your wood, mix and pour with care, then sand and polish patiently — those steps make a mirror finish realistic for hobbyists and pros.
Start on small scraps to build skill and confidence before tackling the family table. Practice, laugh at mistakes, share results, learn from others, and don’t worry — glossy success is repeatable and increasingly quick — you’ll be proud of


For anyone on a budget, does the 32oz or 68oz kit make sense for coasters and small trays? The article helped me gauge project size vs kit size but curious about waste and shelf life once opened.
I buy the 32oz for coasters, 68oz if I plan multiple projects. If you mix only what you need, shelf life of the bottle is usually fine for months if sealed tight.
Smaller kits like 32oz are perfect for coasters and small trays — less waste. Once opened, follow storage instructions (cool, dark). Most resins have a shelf life; check the product label.
Random tip: clamp your silicone molds down during pour if you use them — they can float or warp with heavy pours and create uneven backs. Article’s mold advice was solid. Also, consider buying a small alcohol torch instead of a blowtorch if you’re indoors.
Good practical tip, Noah. Silicone can shift — clamps or weights help. Alcohol torches are kinder for interior work.
Yup, and if you do use a torch, a little canned air (in short bursts) can also help lift bubbles without too much heat.
Exactly — canned air works for tiny bubbles but not big ones. Cheers.
I appreciate the ‘quick rescue tricks’ section. Last month I had a run where a vertical edge dripped — used a razor and re-sanded the edge, then touched up with a small brush and clear coat. Not perfect but saved the piece. Article gave me the confidence to try fixes.
Great recovery story, Olga. Small hand tools and patience go a long way with touch-ups.
Pro tip: keep mixing small bits of epoxy for touch-ups that match the pot life of your area temp, so you don’t end up with mismatched cure.
Good call Samir — I pre-warmed the small mix and it blended better.
This was helpful! I’m setting up a tiny workshop in my garage and the ‘workspace that won’t ruin your project’ tips were gold. Bought a SKIL 5-inch Random Orbital Sander with Dust — dust collection actually changed sanding life for me. Still nervous about fumes though.
FYI some respirators need the right cartridges for organic vapors — check the product spec before buying.
Great choice with the SKIL sander — dust collection makes a big difference. For fumes, the Reusable Half-Face Respirator is recommended, especially for larger pours.
You can also run a small fan for fresh air (not blowing over the project) and open doors if safe. Respirator plus ventilation = happy lungs.
Safety chic indeed 😄 — goggles + respirator = double protection, and it’s worth it for peace of mind.
Thanks — will get the respirator too. Also lol at the goggles on the kit description, safety chic 😅
Fun read. One question: the article mentions sealing wood — any recs for a quick sealant before the main pour that won’t interfere with adhesion? I’ve heard some people use a thin epoxy primer coat, others use thinned poly? 🤷♀️
Thin epoxy seal coats are usually best because they’re compatible and improve adhesion. Avoid poly as a sealer under epoxy — it can interfere with bonding.
I use a diluted epoxy ‘mist’ coat — literally a very thin layer to seal pores before the main pour. Let it cure tacky before the big pour.
Okay long post: I tried the 68oz Crystal Clear No-Bubble Epoxy Resin Kit because the name sold me 😂. Followed mixing ratio exactly, slow stir, popped the bubbles with a torch, but after 48 hours there were still tiny pinholes across the surface. Spent a day sanding and re-coating and now it’s okay but not perfect. Wondering if the wood wasn’t sealed right or if my garage temp (it was around 60°F) killed the cure. Also, is a respirator necessary? I had masks but not a half-face.
– Did I mix wrong?
– Is 60°F too low?
– How do pros avoid pinholes besides torching?
Lessons learned: be patient, and maybe use the Reusable Half-Face Respirator with Safety Goggles next time.
Thanks all — will try a heated mix next and a thin seal coat. Also ordering that respirator. 😅
Thanks for the detailed write-up, Luis. 60°F is borderline; many resins like a warmer 70–75°F for best flow and bubble rise. Pinholes can come from moisture in the wood or trapped air in pores — sealing with a thin coat first helps. And yes, the half-face respirator is a good idea for comfort and safety.
Torching helps but you gotta sweep across fast — don’t linger or you’ll scorch. If your garage is cold, consider a small space heater (safe distance) to up the ambient temp.
I had similar pinhole trouble — learned to do a thin seal coat (about 1–2 mil) first, let it tack, then pour the thicker coat. Also try warming the mixed resin in warm water before pouring to lower viscosity.
Loved the sanding & polishing section. I tried skipping the 600 grit step once to save time and ended up redoing the whole top. Don’t skip. Ever.
Minor gripe: would’ve liked a product comparison table. You mention several kits (68oz, 72oz, 32oz, etc.) but a quick ‘best for beginners’ callout would’ve been neat. Still great write-up overall.
Agree — a TL;DR with best-for-beginners, best-for-deep-pour, best-for-budget would be super useful.
Thanks for the feedback, Ava — great idea. I’ll add a short comparison in the next update: which kit suits project size and experience level.
I tried a cheap epoxy once and it yellowed in direct sun. The article’s section on types and UV resistance saved me — ordered the 72oz Puduo Crystal Clear Epoxy Resin Kit after reading. Fingers crossed it stays clear on my outdoor bench.
If you want extra caution, use marine-grade epoxy for outdoor projects — more resistant but pricier.
Good move — UV stability is key for outdoor pieces. Keep in mind some resins still yellow slowly; consider UV-resistant topcoat if it’ll be full sun.
Thanks — will look into topcoats. Didn’t know you could add inhibitors to just the top layer.
Good tips everyone. Appreciate the practical advice 👍
Also keep it shaded when possible or use a UV-stable finish. I had better luck with added UV inhibitors in the last coat.
Yes, inhibitors or a dedicated UV topcoat layer can extend clarity. Test on a scrap piece first.
Honestly, the humor in the wrap-up made me smile. ‘From messy pour to mirror finish (Yes, You Can Do It)’ — thanks. I’m trying this weekend. Slightly terrified but motivated.
Quick Q: has anyone used the High-Gloss 1 Gallon Deep Pour Epoxy Resin for a river table 2 inches deep? Article mentions deep pour but not exact per-pour max. Don’t wanna ruin 30 hours of work 😂
Good question, Tom — many deep-pour resins are rated for 1–2 inches per pour depending on ambient temp. Check the product spec for exotherm limits. When in doubt, do thinner layers and build up.
I poured about 1–1.5 inches per pour with that brand and waited 24 hours between pours. Temps and mixing REALLY matter tho.
Little rant: watching YouTube folks torch the heck out of resin makes me nervous. Article’s calmer approach (light passes) was reassuring. 🔥🚫
Totally — torching is about quick passes to pop bubbles, not flaming the resin. Safety first.
Anyone mix pigments with the High-Gloss 1 Gallon Deep Pour? Article touched on aesthetics but not how pigments affect cure or bubbles. I want a translucent blue river but worried pigment could trap bubbles or affect clarity.
Also remember pigments can affect UV stability. Choose dyes rated for epoxy if possible.
Awesome — will do a test pour first. Thanks!
I used a tiny bit of translucent blue dye and it looked great. Don’t overdo it — less is more for a clear river effect.
Pigments can increase viscosity and sometimes trap bubbles if overused. Use resin-compatible pigments in small amounts and test on a sample. Translucent dyes usually keep clarity better than opaque pigments.
Short one: article reminded me to buy a Pin Wood Moisture Meter for my hardwood slab — couldn’t believe how much moisture was in it. If you’re doing river tables, this tool is a must, honestly.
Totally — wood moisture is often overlooked. Glad the meter helped. Did you let the slab acclimate after measuring?
Great article — super clear steps. I used the Crystal Clear 32oz Epoxy Resin Casting Kit for a small serving board and it came out glossy after polishing with a microfiber cloth. Didn’t think I could get a mirror finish at home. A tip from me: let the first coat level for at least 12 hours before a second thin coat.
Nice! I’ve been nervous about using small kits. Do you sand between coats or just pour after 12 hours?
I did a light 320 grit scuff with a sanding block between coats — helps adhesion w/out scratching the gloss too deep.
Thanks Sarah — glad it worked! Letting the first coat settle is huge. Did you seal the wood first?